本文說明透過 Command Line 的方式, 使 Raspberry PI 可透過 Bluetooth 接收檔案
測試機器:
1. Raspberry PI 3 Model B
2. Windows 10 PC
第一部分 - 連線
目的是先使 Raspberry PI 3 與 Windows 10 PC 透過藍芽連線建立起來.
1. 先在 Raspberry PI 這端, 打開 terminal 執行
# hciconfig
確認 Bluetooth hci device 有正常運作, 可查看印出的訊息是否有 "UP RUNNING" 字串.
接著依序執行.
# sudo bluetoothctl
power on
agent on
default-agent
discoverable on
若是 command 都執行成功, Raspberry PI 的 Bluetooth 會處於可被 scan 狀態.
2. 接著在 Windows 10 PC 這端,
點選右下角 -> 藍芽 -> 新增藍芽裝置

進入到藍芽設定頁面後,
點選 新增藍芽或其他裝置 -> 藍芽

尋找 "raspberry pi" 裝置, 點選它並連線, 連線過程會顯示 6碼 passkey,
在 Raspberry PI 輸入 yes, Windows 10 PC端確定, 即可完成連線.
連線完成後可在 Windows 10 PC端看到連線狀態.

第二部分 - Raspberry PI 運行 Obexpushd
在 Raspberry PI 這端, 再打開一個 Terminal, 執行
1. Install obexpushd
sudo apt-get install obexpushd
2. 編輯 dbug-org
sudo nano /etc/systemd/system/dbus-org.bluez.service
加 "-C" 在 "ExecStart=" 最後面
類似 "ExecStart=/usr/lib/bluetooth/bluetoothd -C"
3. 創立一個資料夾供之後接收檔案用
sudo mkdir /bluetooth
4. Reboot
5. 運行 obexpushd service
sudo obexpushd -B -o /bluetooth -n
如果運行成功, 沒有錯誤訊息, 即會顯示如下
Listening on bluetooth/[00:00:00:00:00:00]:9
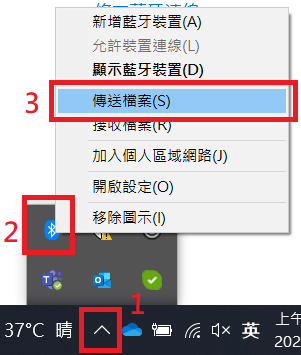
第三部分 - Winsows 10 PC 傳送檔案給 Raspberry PI
在 Windows 10 PC 端
1. 點選右下角 -> 藍芽 -> 傳送檔案

3. 選擇檔案, 並開始傳送.

4. 傳送中.

5. 傳送完成.

6. 在 Raspberry PI 端, 在剛剛運行 obexpushd 的 Terminal, 會顯示
Creating file "/bluetooth/xxx.txt"
可在 /bluetooth 資料夾檢查是否有接收到檔案.
#參考資料
https://forums.raspberrypi.com/viewtopic.php?p=963751#p963751